
Custom Function Calling Router for Gemma-3
Implement and monitor a function-calling workflow using LangGraph, Google GenAI, Qdrant, and Opik.

Problem Statement: Most open-weight (open-source) models don’t natively support function calling during inference. One key example is the Gemma-3 family models pulled from the official Ollama registry, which don’t include dedicated tool/function calling tags, and Ollama returns an error when native tool support is requested directly.

In this article, we’ll explore an alternative approach to perform function calling at inference using prompt engineering and a custom interpreter tool.
What is Function calling?
Function calling is how LLMs trigger real actions beyond text generation. Think of it as giving the model a set of tools it can call when needed, like searching the web, querying a database, or performing calculations.
For example, if you ask, “What’s the match score of the ongoing Cricket match?”, a function-calling model won’t just guess. It’ll call an API, get the actual data, and respond with accurate information.
Function Calling in LLMs
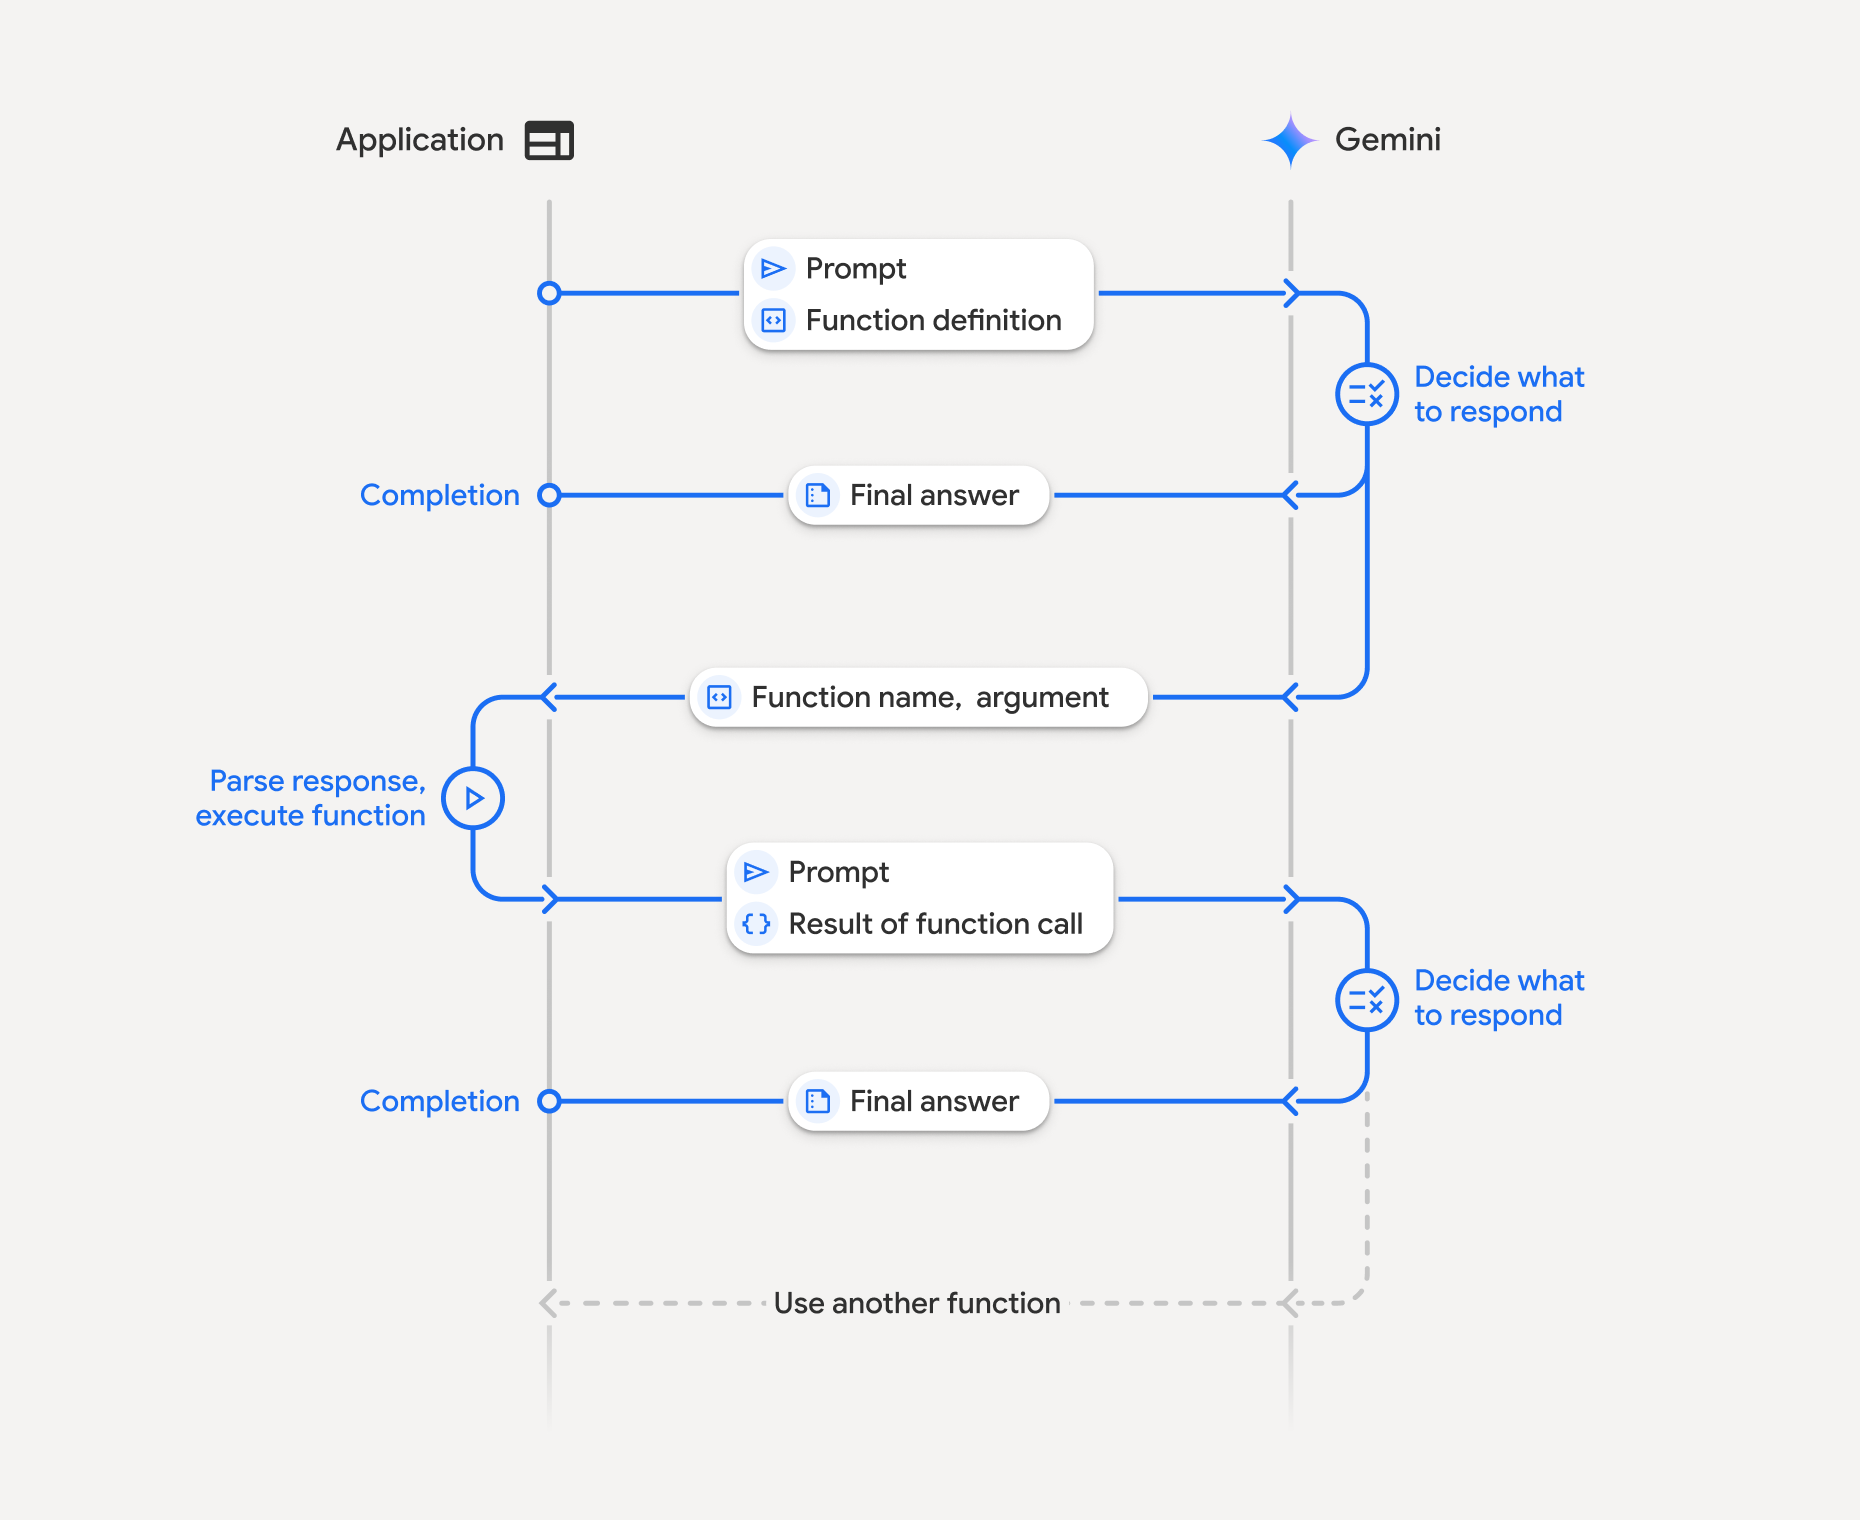
Some models, such as Gemini or GPT-4, support native function calling. This means they can return structured outputs indicating which function to call and with what parameters. The system automatically runs the function, feeds the result back to the model, and then produces the final response, as shown in the figure.
The process begins when the application sends a prompt along with a function definition. The model reads it and decides what to do next. If it already knows the answer, it directly returns a final response. But if it needs more data, it replies with the function name and arguments.
The application then parses the response and executes the function locally or through an API. Once the function runs, the result of that function call is sent back to the model inside another prompt. Finally, the model uses this new context to compose the final answer.
The Problem with Gemma
Most open-weight models, including the Gemma-3 family, don’t have native support for function calling. Models pulled from Ollama’s registry don’t include the function/tool tags used by APIs like OpenAI or Gemini.
If you’re building an Agentic RAG or tool-augmented system, you can’t skip function calling, as it’s essential for grounding and control.
So, the question becomes: How do we replicate function calling on Gemma even when it doesn’t support it natively?
Let’s look at the custom approach.
Subscribe to stay connected on the upcoming articles:
Our approach
We replicate function calling through prompt engineering and a runtime interpreter. The model doesn’t need native tool tags, so we instruct it how to format a tool call using a structured prompt.
Here’s the flow:
The prompt tells the model:
If you need to use a tool, wrap the code inside triple backticks labeledtool_codeas the delimiter.The model responds either with a direct answer or a code block like this:
```tool_code
web_search("live score match scores between India vs Australia")
```
The application extracts the function call, executes it locally, and wraps the result as:
```tool_output
<result>
```
This result is passed back to the model.
The model reads it and generates the final response.
Code Breakdown: Function Calling Router for Gemma-3
Our goal:
Have 2 tools: Knowledge base and Web Search tool
If the query is from the knowledge base, route to the retrieve_docs tool
If the query is not from the knowledge base, route to the web_search tool
Installation
A quick setup, and we’re ready to wire things up:
!pip install langgraph langchain-community
!pip install langchain-qdrant fastembed
!pip install pypdfium2
!pip install duckduckgo-search ddgs # custom function
!pip install opik # monitoring and tracing
!pip install langchain-google-genai  # gemma-3-27b-it
Before creating a custom tool for retrieve_docs, we need to index the documents inside the Vector database, i.e., Qdrant.
# data extraction and chunking
# my data is inside: a folder- data/*pdf

from uuid import uuid4
from langchain_community.document_loaders import FileSystemBlobLoader
from langchain_community.document_loaders.generic import GenericLoader
from langchain_community.document_loaders.parsers import PyPDFium2Parser

# embedding model
from langchain_community.embeddings import FastEmbedEmbeddings

# vector database dependency
from qdrant_client import QdrantClient, models
from langchain_qdrant import FastEmbedSparse,RetrievalMode
from langchain_qdrant import QdrantVectorStore

# tool call
from langchain_community.tools import DuckDuckGoSearchRun
Data loading- Raw data extraction
With reference to this PDF Parser comparison paper, PDFium performs decently good on Financial documents. https://arxiv.org/abs/2410.09871. Create a directory named data, and load all the PDF files from the directory.
loader = GenericLoader(
    blob_loader=FileSystemBlobLoader(
        path=”data”,
        glob=”*.pdf”,
    ),
    blob_parser=PyPDFium2Parser(),
)
docs = loader.load()
Load both dense and sparse embedding vectors.
To make the knowledge searchable, we load both dense and sparse embeddings. This gives us the flexibility to perform a hybrid search from dense vectors (vector semantic search) and coverage from sparse ones (lexical or keyword search).
dense_model_name = "jinaai/jina-embeddings-v2-base-en"
sparse_model_name = "Qdrant/bm25"

dense_embeddings = FastEmbedEmbeddings(model_name = dense_model_name)
sparse_embeddings = FastEmbedSparse(model_name = sparse_model_name)
Initialize your Vector database and configure the collection- Hybrid Search
Now we set up the Qdrant collection. One part handles dense embeddings, the other manages sparse vectors.
First, you need to index your documents into the Qdrant Client to the cloud that requires an endpoint URL and the API Key. Get your credentials here:
Sign up at Qdrant Cloud and create your account.
Now, create your first free cluster and select the default region and the cloud provider. You just need to provide a name and create a cluster.
Once the cluster is created, you will find the URL with the port number ending with 6333 and the API key. Save these credentials.
collection_name = "agenticrag"
client = QdrantClient(
    url = "<replace-with-your-endpoint-url>",
    api_key = "<replace-with-your-api-key>",
)

client.create_collection(
    collection_name = collection_name,
    vectors_config = {
        "dense1": models.VectorParams(size = 768,
                                     distance = models.Distance.COSINE
                                     )},
    sparse_vectors_config={
        "sparse1": models.SparseVectorParams(
            index = models.SparseIndexParams(on_disk=False),
            modifier = models.Modifier.IDF,
        )
    },
)
Index your document with Retrieval Mode - Hybrid
Each document gets a unique ID, embedded, and pushed into Qdrant. This turns our raw text into a searchable knowledge base that can instantly respond to queries.
NOTE: Make sure to have the vector_name and sparse_vector_name same as the name used to create the collection.
db = QdrantVectorStore(
    client = client,
    collection_name = collection_name,
    embedding = dense_embeddings,
    sparse_embedding = sparse_embeddings,
    retrieval_mode = RetrievalMode.HYBRID,
    vector_name = "dense1",
    sparse_vector_name = "sparse1",
)

uuids = [str(uuid4()) for _ in range(len(docs))]
db.add_documents(documents=docs, ids=uuids)
Before wiring up tools, we give our retriever a quick sanity check. Test the retriever with a user query and get the relevant documents using MMR search for diversity.
I have written one article on Understanding Maximum Marginal Relevance.
query = "module-2 content"
retriever = db.as_retriever(search_type="mmr",search_kwargs = {"k":3})
relevant_docs = retriever.invoke(query)
print(len(relevant_docs))
Custom Tool definitions
Tool-1 Knowledge base - retrieve_docs
Whenever the model thinks the answer is inside our knowledge base, it calls retrieve_docs to fetch the relevant document chunks.
def retrieve_docs(query:str) -> str:
  """
  retrieve relevant document from the knowledge base. use retrieve_docs function to get the results

  Args:
      query: user prompt to retrieve the context
  """
  response = retriever.invoke(query)
  context = [docs.page_content for docs in response]

  return "\n".join(context)
Tool-2 Browser web_search using DuckDuckGo.
For anything beyond the knowledge base, we call the web_search tool. The search engine used is DuckDuckGo for now, but easy to switch to Tavily later if needed for better performance.
def web_search(query:str) -> str:
    """
    search results from the Google web browswer to the user query
    Args:
       query: user prompt
    """

    browse = DuckDuckGoSearchRun()
    context = browse.invoke(query)
    return context
Execution Interpreter Tool
Now that we have the 2 tools defined, whenever the model picks the relevant tool, we need to make this call and execute the function using the arguments list passed. Here, we handle function calls dynamically. The model’s tool code runs inside a controlled space, captures outputs, and sends them back
def extract_tool_call(text):
    import io, re
    from contextlib import redirect_stdout

    pattern = r”```tool_code\s*(.*?)\s*```”
    match = re.search(pattern, text, re.DOTALL)
    if match:
        code = match.group(1).strip()
        f = io.StringIO()
        with redirect_stdout(f):
            result = eval(code)
        output = f.getvalue()
        r = result if output == ‘’ else output
        return f’```tool_output\n{str(r).strip()}\n```’‘’
    return None
Define LangGraph State Workflow
The graph acts as the backbone connecting logic nodes, ensuring smooth flow between the states. In LangGraph, nodes define logic that are nothing but Python functions, and edge defines the flow.
import os
from google.colab import userdata
from google import genai

from langgraph.graph import StateGraph, START, END
from typing import TypedDict
About OPIK
Opik is an open-source platform developed by Comet to provide comprehensive observability, evaluation, and monitoring for large language model (LLM) applications across their development and production lifecycle.
Get your OPIK API Key: OPIK- Trace and Monitor
Get your Gemini API Key: AI Studio
os.environ["GOOGLE_API_KEY"] = userdata.get("GOOGLE_API_KEY")
os.environ["OPIK_API_KEY"] = userdata.get("OPIK_API_KEY")
os.environ["OPIK_WORKSPACE"] = "tarun-r-jain"
os.environ["OPIK_PROJECT_NAME"] = "routing-app"
We first define the State with the attributes that need to be preserved throughout the workflow. In function calling, these attributes include the user query, the context returned from the function call, the function call arguments, and the final response, which represents the model’s answer.
class AgentState(TypedDict):
    query: str
    context: str
    tool_response: str
    final_response: str
Node-1 Generate Tool Cool
This is the router’s thinking step. It decides whether to fetch from the knowledge base or go online. If it’s unsure, it plays it safe and goes for retrieve_docs. If not found, then it checks web_search as a fallback.
def generate_tool_call_node(state: AgentState):
    query = state[”query”]

    prompt = f’‘’
    You are expert router Agent, given the User Question, you need to pick relevant tools from the available Python methods only.
    At each turn, if you decide to invoke any of the function(s), it should be wrapped with ```tool_code```.
    The python methods described below are imported and available, you can only use defined methods.
    The generated code should be readable and efficient.
    The response to a method will be wrapped in ```tool_output``` use it to call more tools or generate a helpful, friendly response.
    When using a ```tool_call``` think step by step why and how it should be used.

    The following Python methods are available:

    ```python
    def retrieve_docs(query:str) -> str:
      “”“
      retrieve relevant document from the knowledge base. use retrieve_docs function to get the results
      Args:
          query: user prompt to retrieve the context
      “”“

    def web_search(query:str) -> str:
      “”“
      search results from the Google web browswer to the user query
      Args:
        query: user prompt
      “”“
    ```
    - retrieve_docs needs to be picked by default in case of confusion. Retrieve docs contains information on Tips and Tricks for Vibe coding
    - web_search: needs to be used if web search and information needs to be retrieved
    User: {query}
    ‘’‘

    tool_response = llm_client.models.generate_content(
        model=”gemma-3-27b-it”,
        contents=prompt,
    )
    return {”tool_response”: tool_response.text}
Node-2 Answer Generation
Once we have the context and the function call response, we use Gemma-3 to answer the final response for the given user query.
def generate_final_answer_node(state: AgentState):
    query = state[”query”]
    tool_response = state[”tool_response”] # tool_code

    context = extract_tool_call(tool_response) # context

    final_prompt = f”“”
    Answer the user question from the given CONTEXT.
    <context>
    CONTEXT: {context}
    </context>
    <question>
    User Question: {query}
    </question>
    “”“
    results = llm_client.models.generate_content(
        model=”gemma-3-27b-it”,
        contents=final_prompt,
    )
    return {”final_response”: results.text,”context”: context}
Compile the workflow
Now we stitch the nodes together: define the start, link transitions via, and mark the end.
workflow = StateGraph(AgentState)
workflow.add_node(”generate_tool_call”, generate_tool_call_node)
workflow.add_node(”generate_final_answer”, generate_final_answer_node)

workflow.add_edge(START, “generate_tool_call”)
workflow.add_edge(”generate_tool_call”, “generate_final_answer”)
workflow.add_edge(”generate_final_answer”, END)

graph = workflow.compile()
To trace and monitor your workflow, you can simply use the track decorator, and for additional information to trace, you can use opik_context and update the trace metadata.
from opik import track, opik_context

@track
def get_response(query):
  result = graph.invoke({”query”:query})

  opik_context.update_current_trace(
      metadata={
          “tool_response”: result[’tool_response’]
      }
  )

  return result[’final_response’]

get_response("who is Lionel Messi?")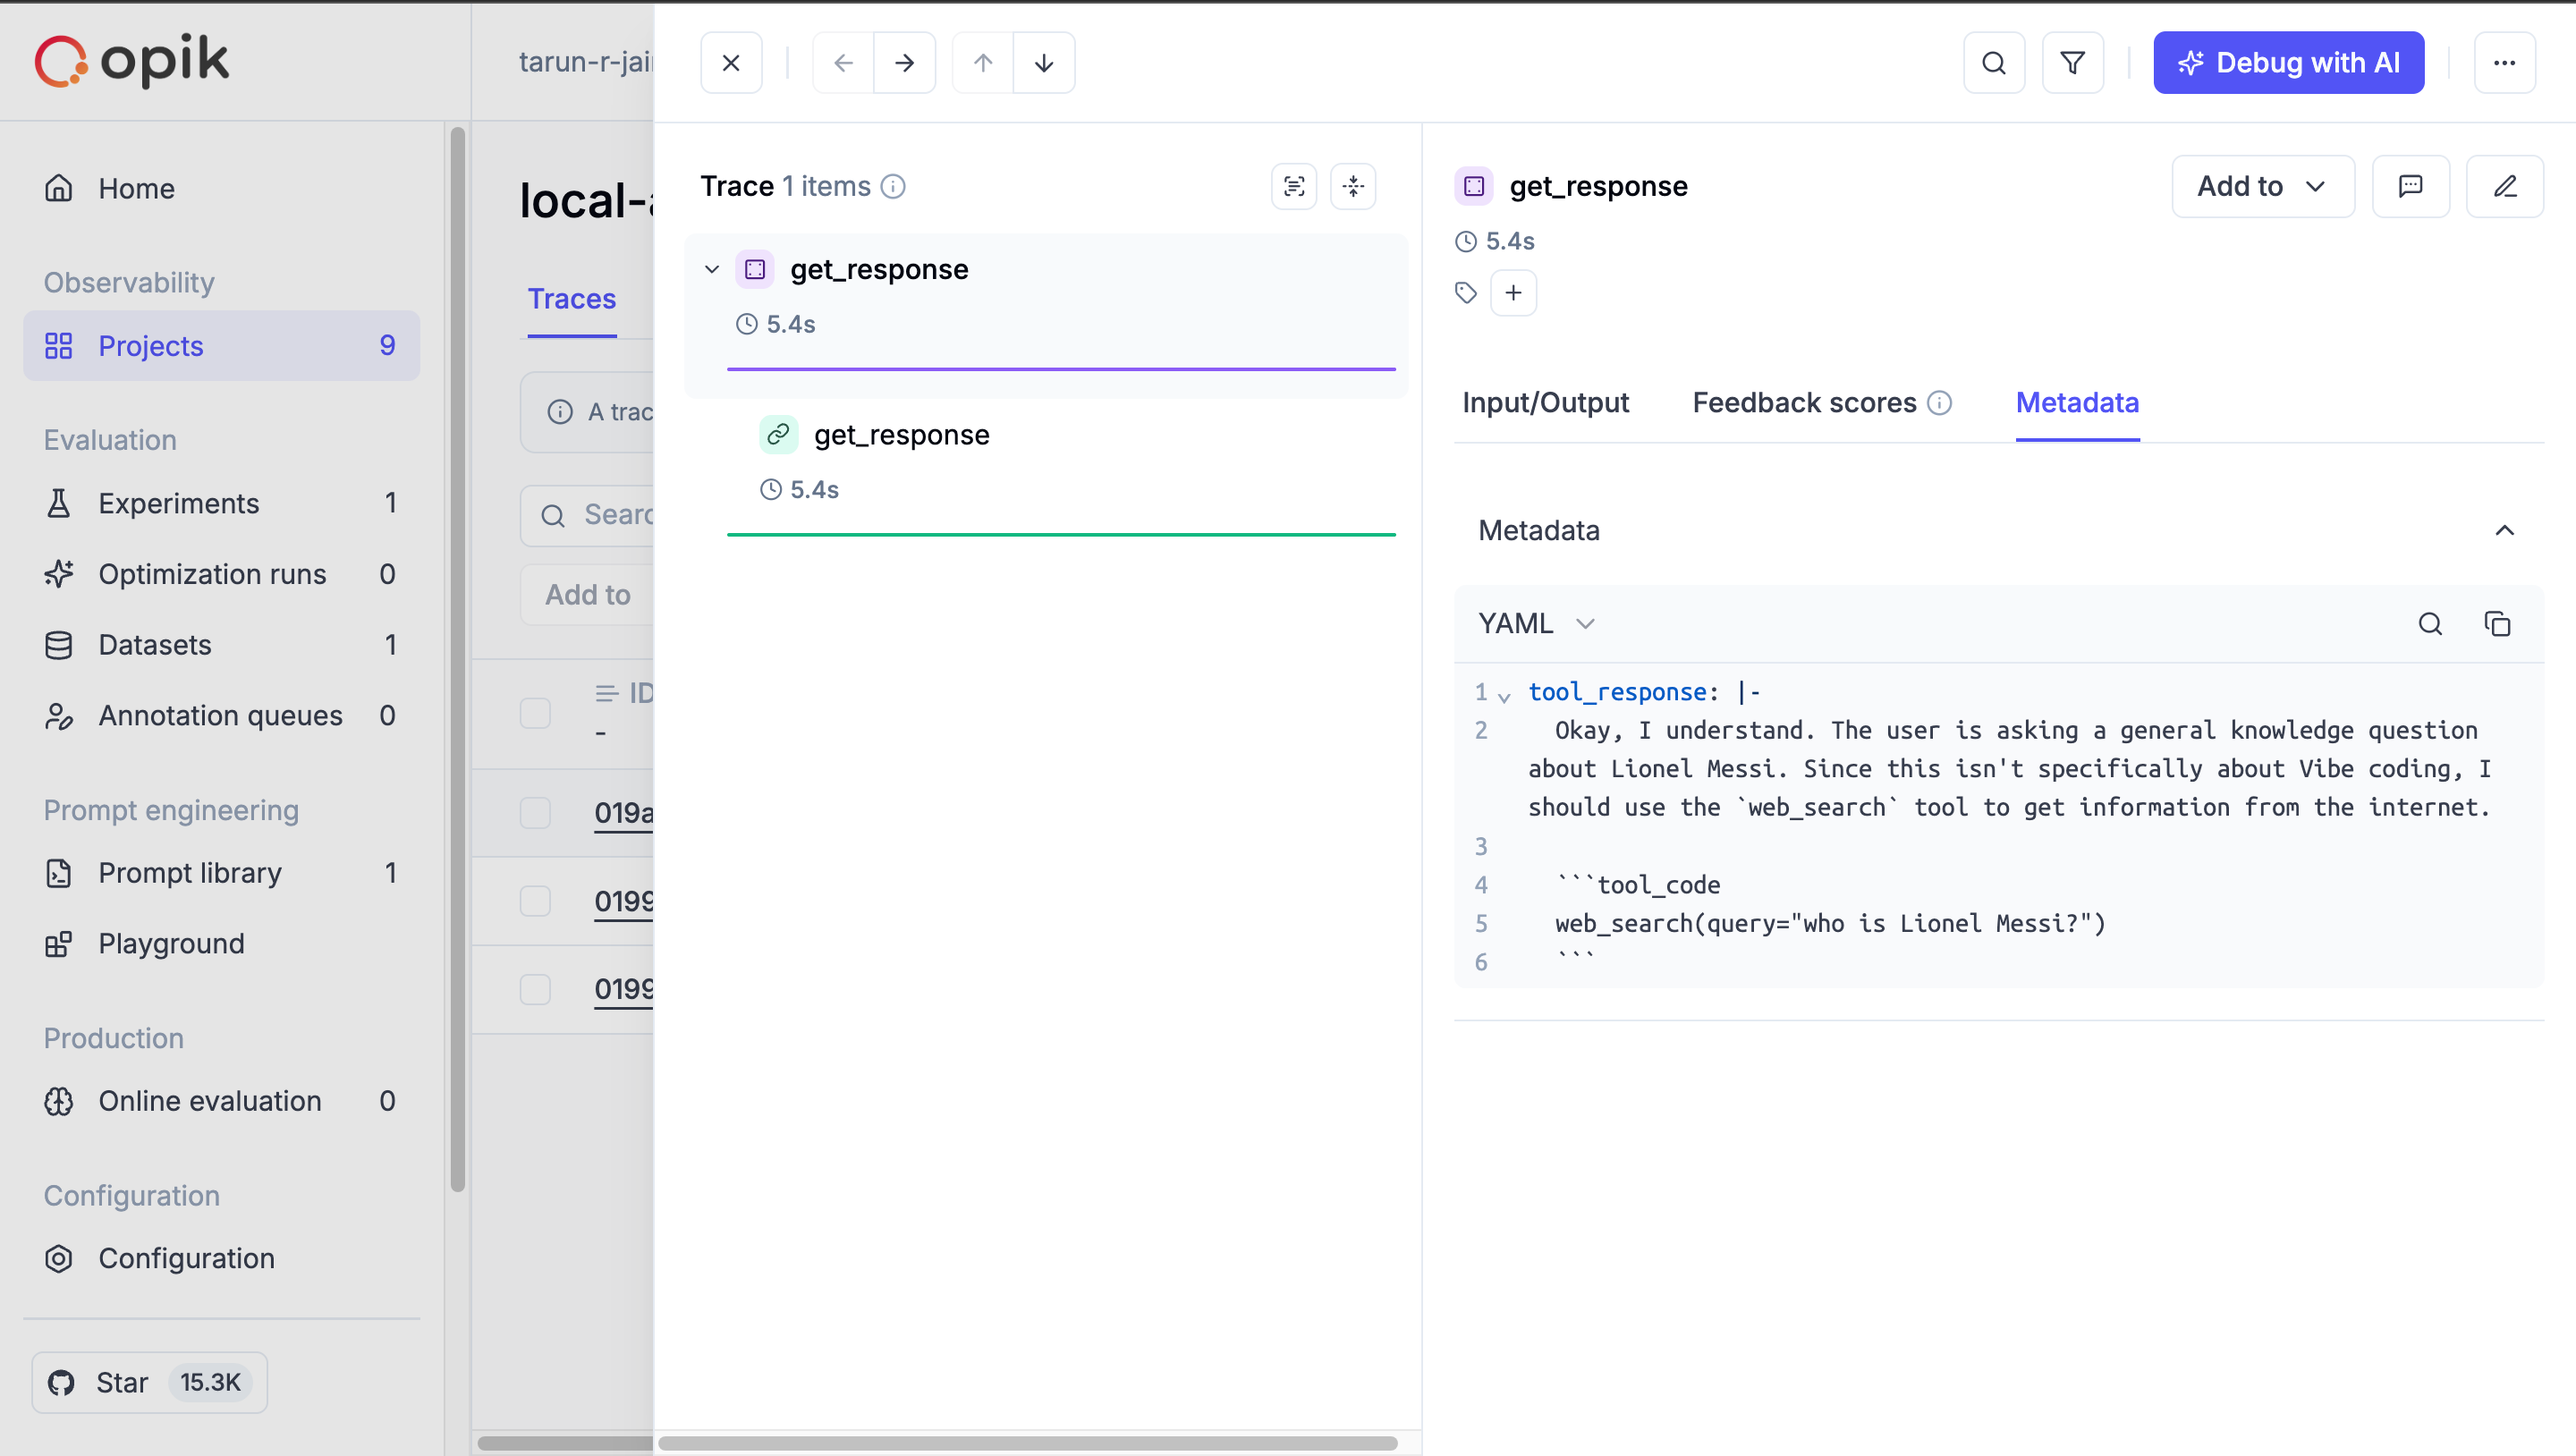

This is it from this article, don’t forget to subscribe now for the upcoming article.
Great work, Tarun. Keep it rolling.
Early follower on substack do post often on substack from now on!